The first iteration of most software is a prototype. The purpose of a prototype is to validate a hypothesis or learn more about a market. Because a prototype is likely to undergo radical changes or total abandonment in face of the information it uncovers, the faster you can generate a prototype, the better.
To learn the most, great teams don't just mockup UIs. They use modern tools to rapidly transform ideas into working software. These high-fidelity prototypes let a team quickly de-risk the project.
Airtable is a killer tool for quickly standing up high-fidelity prototypes.
Airtable can be to your prototype's data model what Figma is to your prototype's interface. It allows you to quickly create, iterate, and change the data that powers your app in minutes. Helping you learn more about your ultimate use case and product. From the bits to the pixels.
But as with all powerful tools, there is an 80/20 rule that applies. A couple tricks can make building prototypes on Airtable much easier.
Two limitations to keep in mind
There are a couple of Airtable limitations you should be aware of from the start. For many prototypes this shouldn't be an issue (and if these items are an issue - I would ask, "have you scoped your prototype?").
Record limits
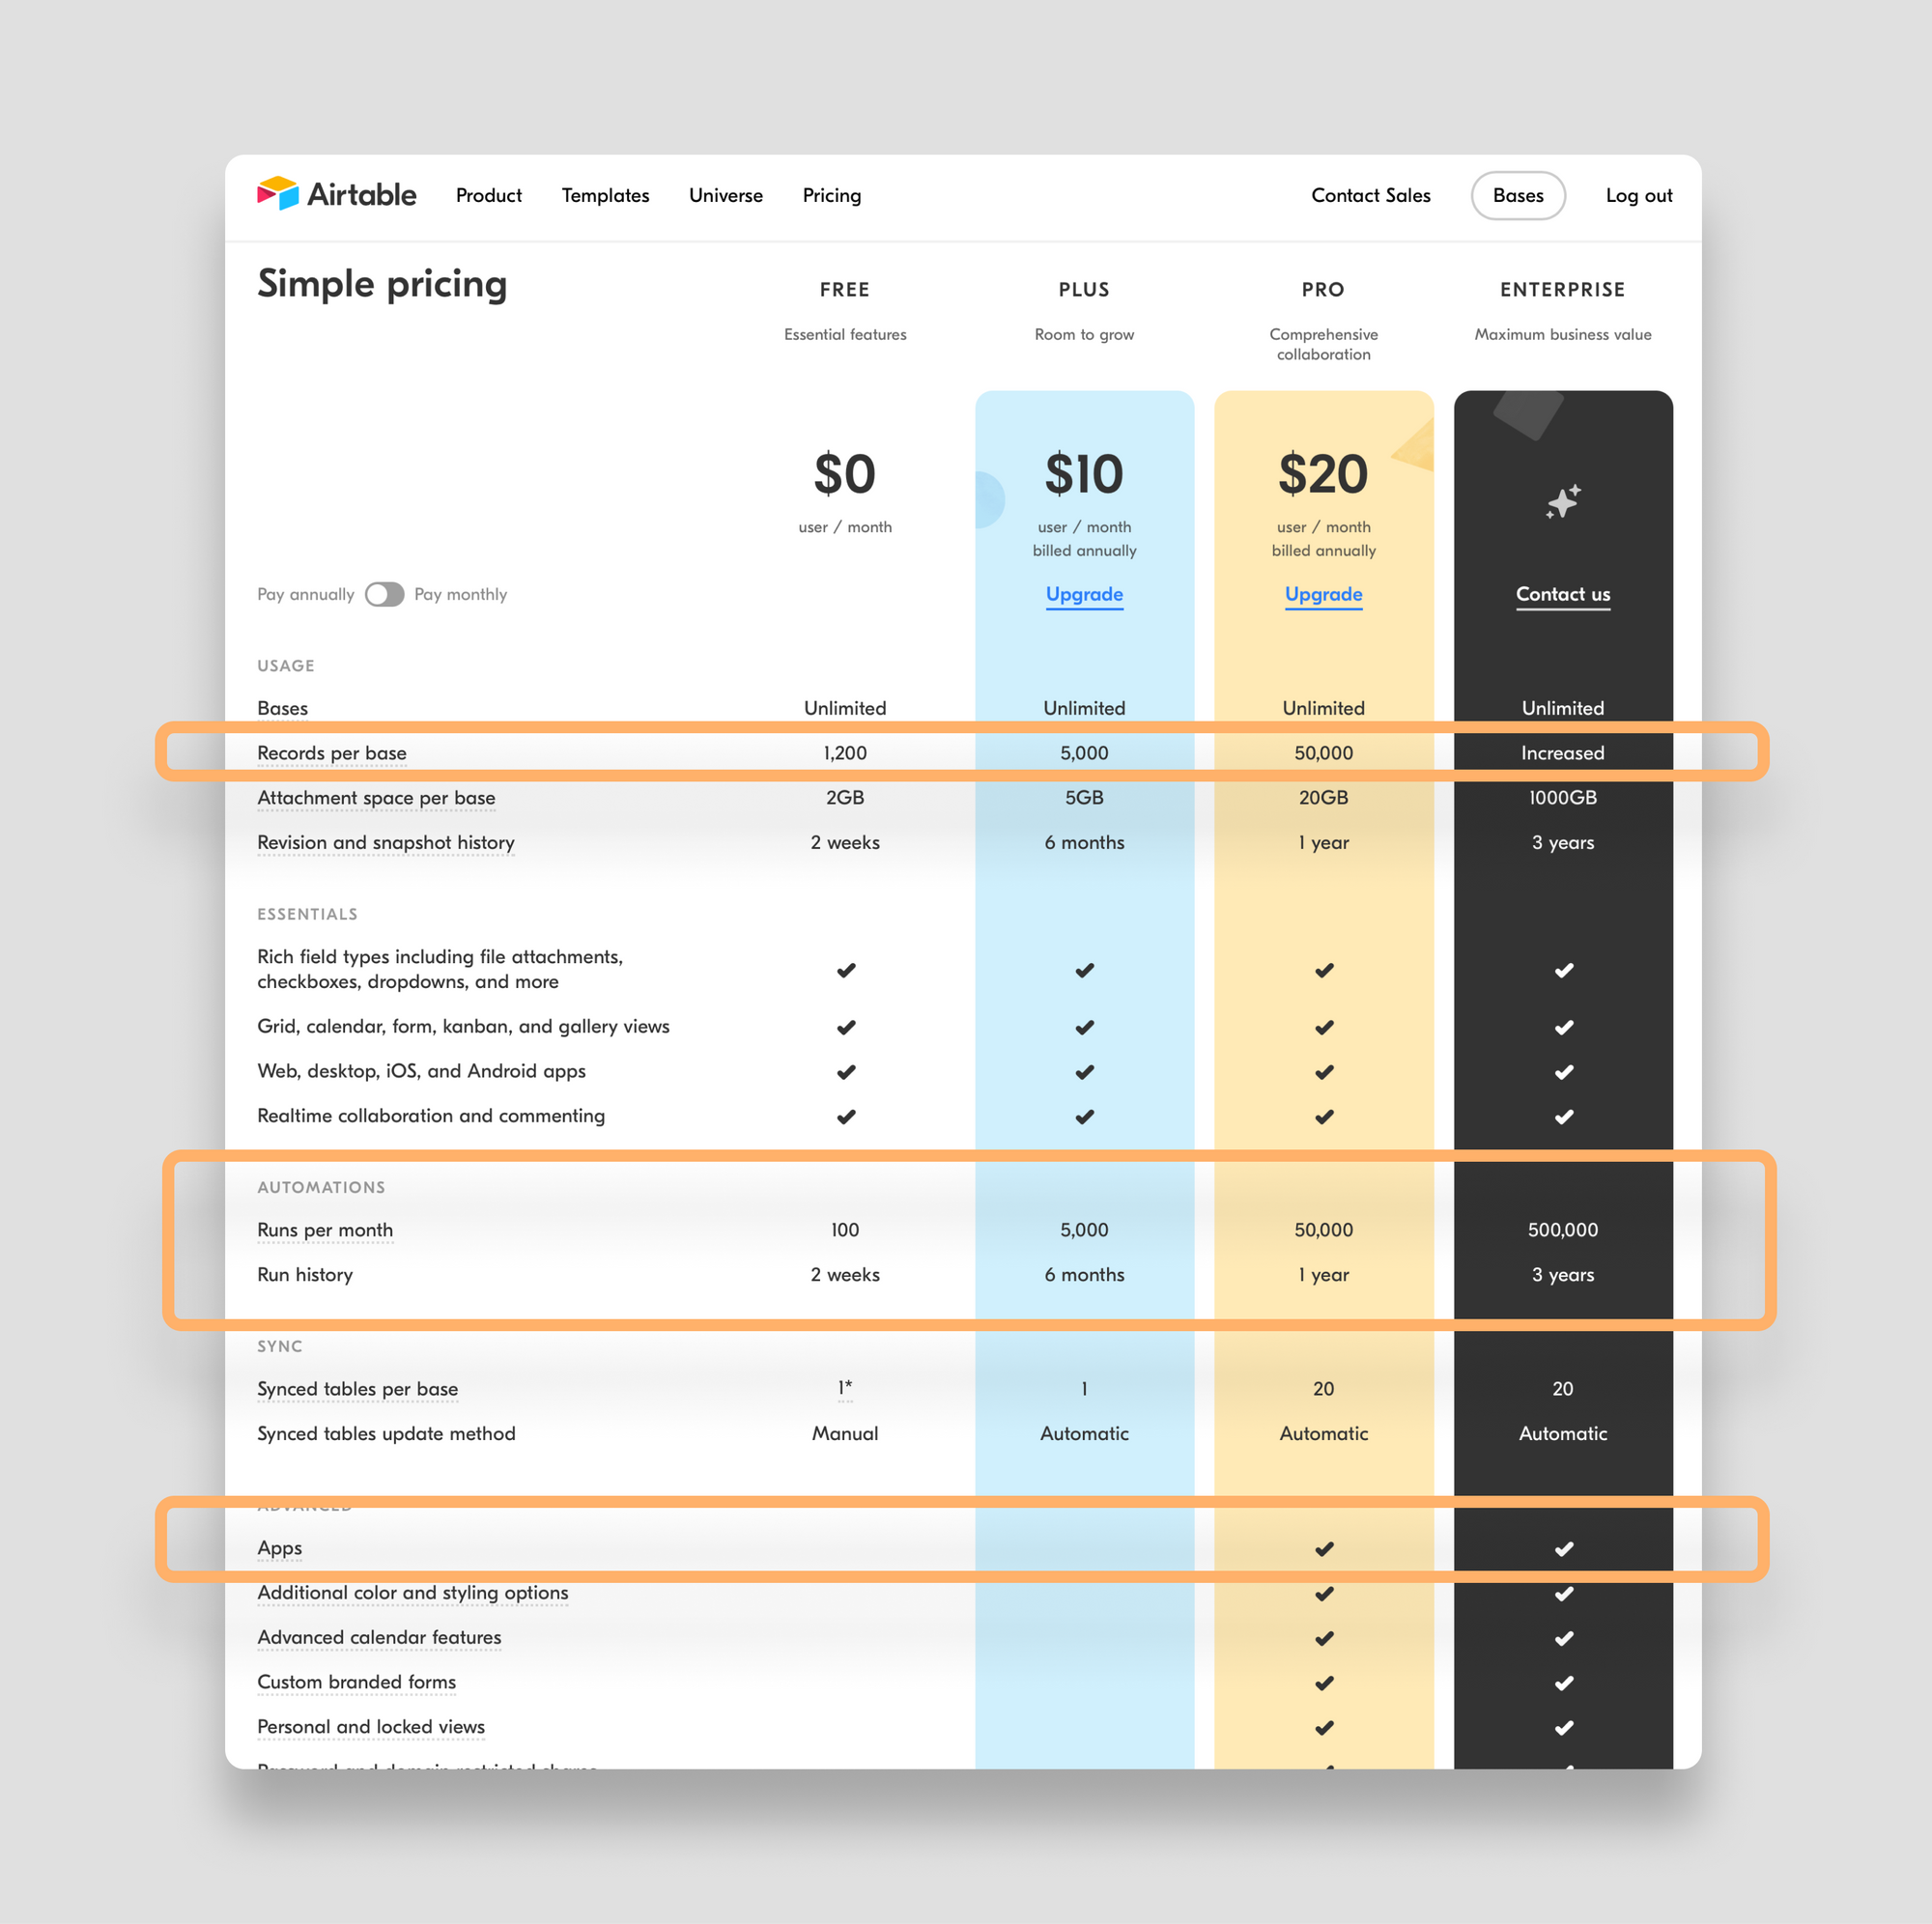
Airtable maxes out at around 100,000 records per base on the enterprise plan. We've seen companies go beyond 100,000 records in a base, but the front-end of Airtable begins to noticeably slow.
Different Airtable plans have different data limits (records, automations, etc). So keep these in mind when you're prototyping:

If prototyping your application is going to require hundreds of thousands of records, Airtable isn't for you.
API rate limits
The Airtable REST API is limited to 5 requests per second per base.
So if multiple clients are making a request to the same base, you might see some 429s.
This limit can be particularly onerous for reads. We'll talk about this more later on - but tools like Sequin abstract the API quota and make prototyping on your Airtable data far simpler.
Best practices for building Airtable prototypes
You probably get the picture by now, Airtable is endlessly adaptable - it's what makes prototyping on Airtable so powerful. But endless configuration comes with all the intellectual yack shaving and bike-shedding that can slow projects way down. So we would propose a couple of conventions to help you build quickly.
Create a developer environment
To build quickly, you need to be able to break things. To give you this freedom with an Airtable prototype you should create a production and dev base in your workspace.
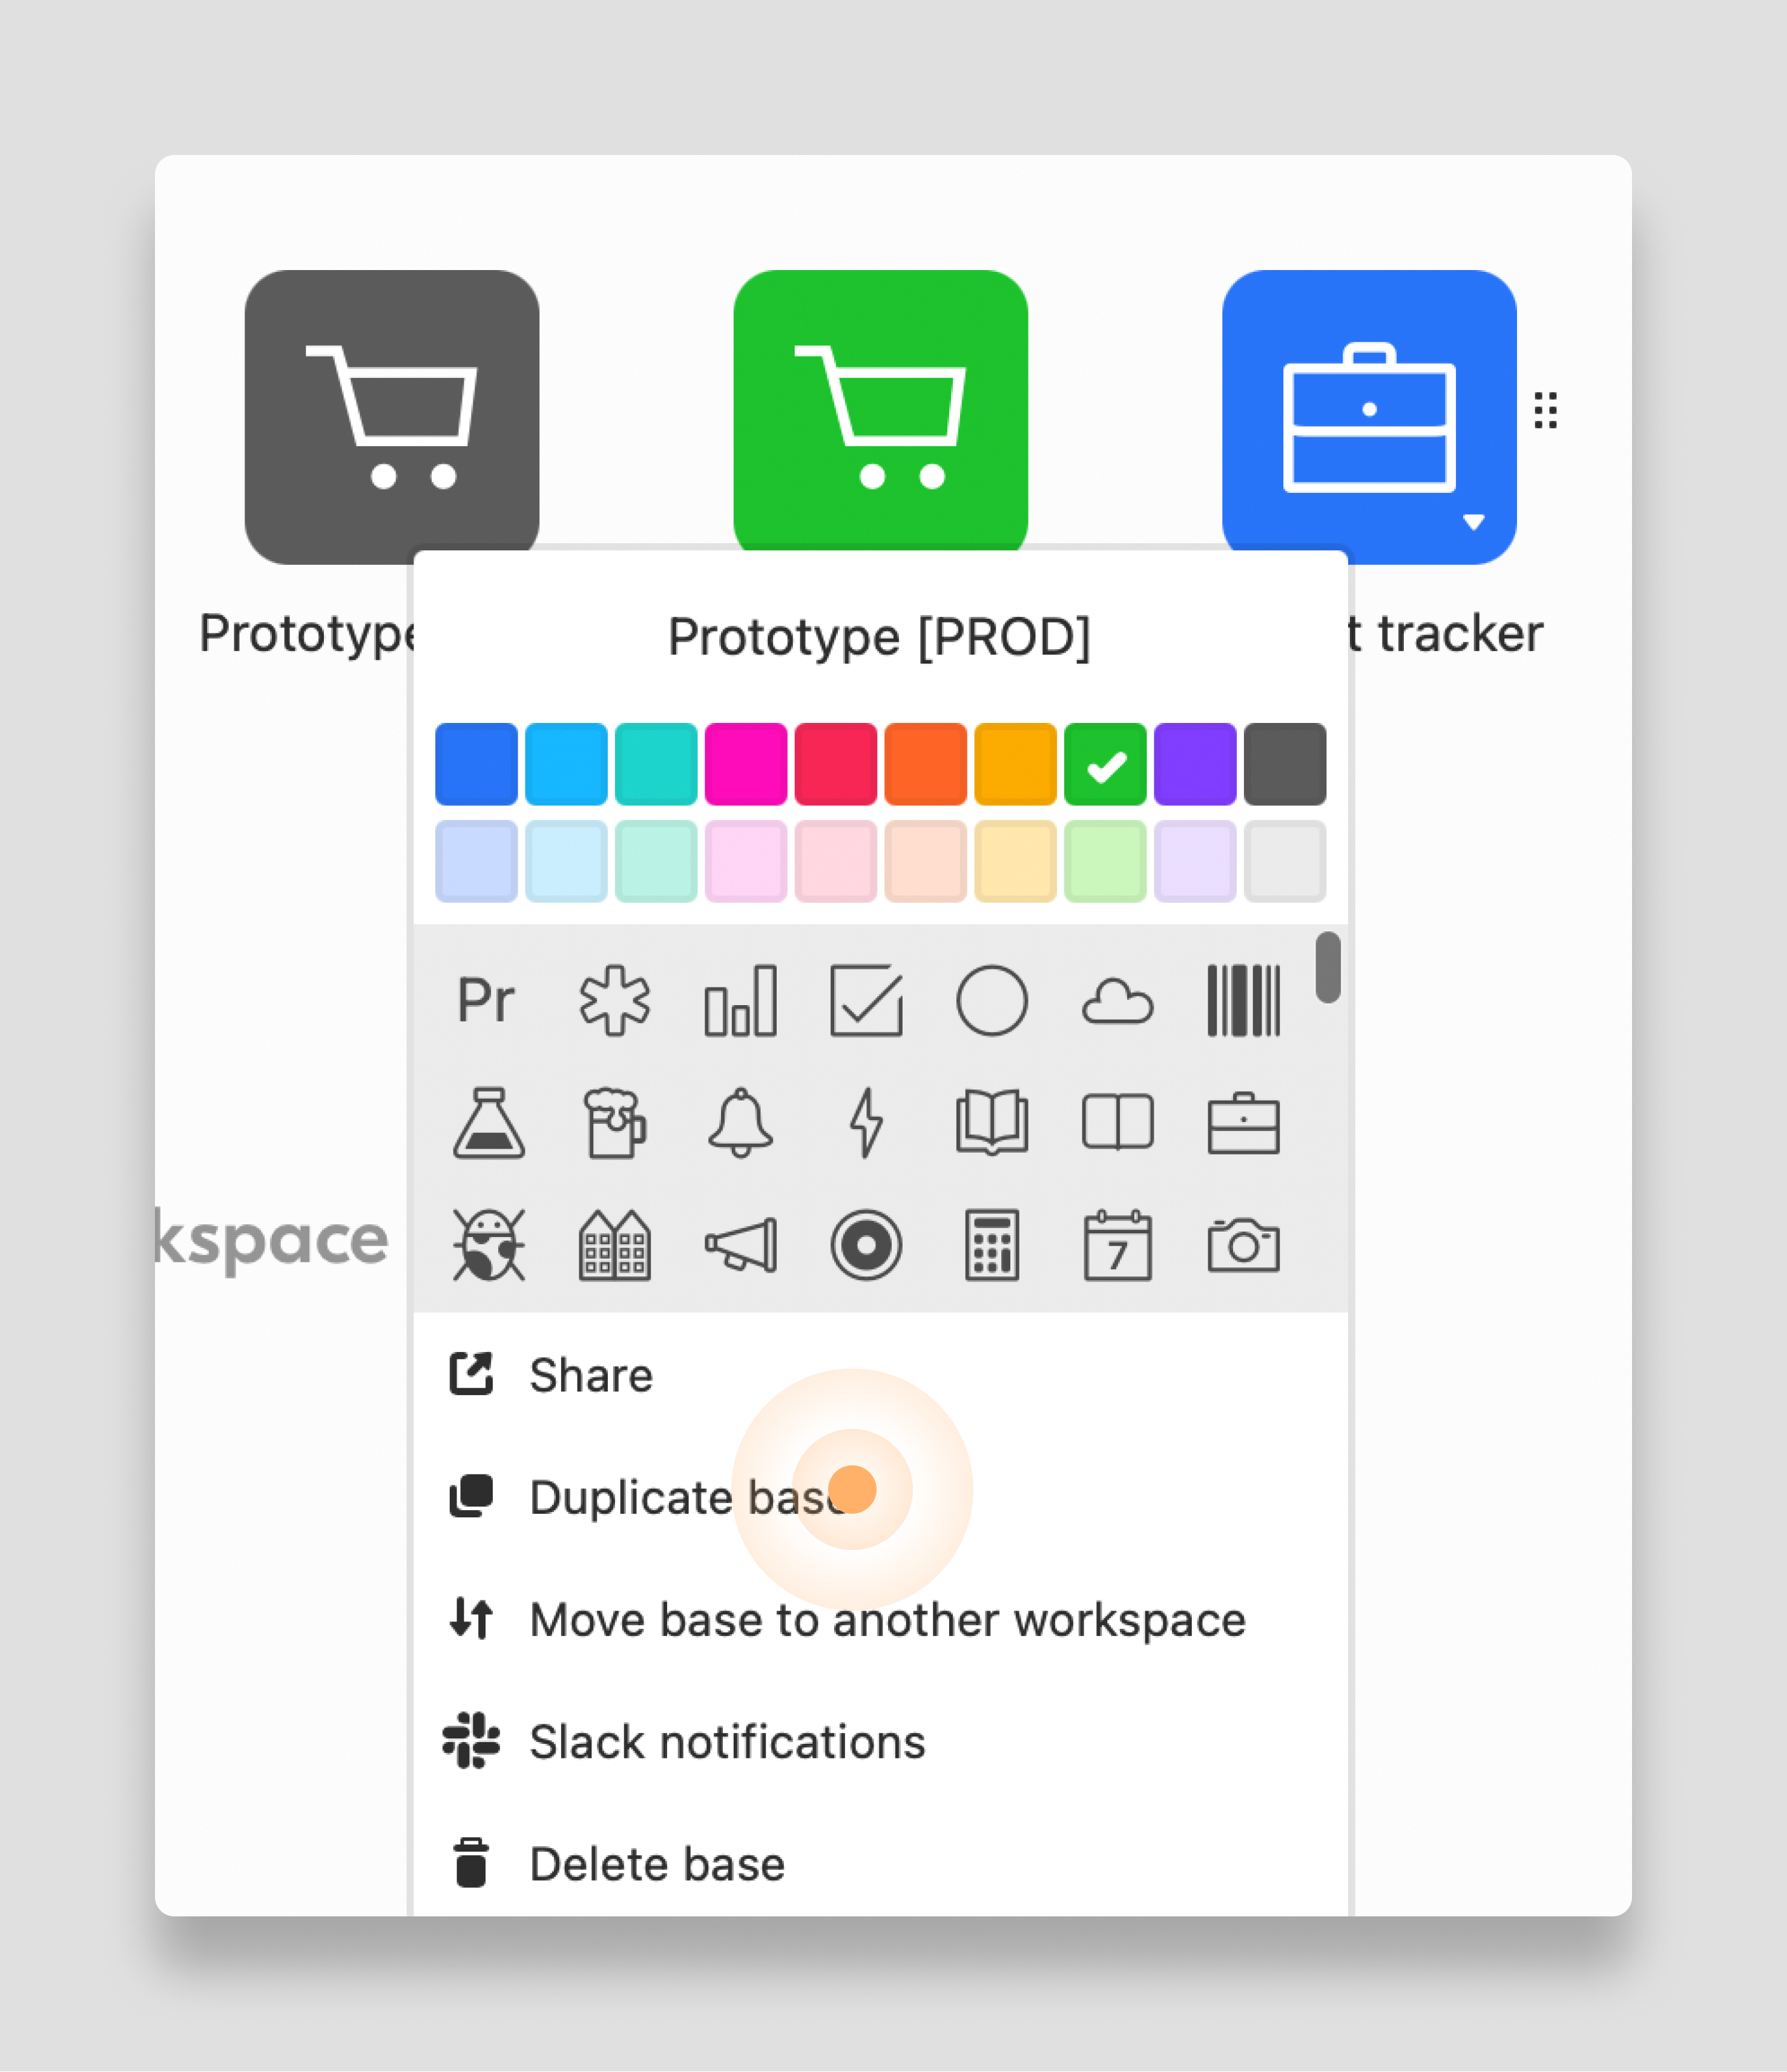
Airtable makes this simple. First, set up your production base. Then duplicate the base to create a development environment with the same structure. Now, you can change the schema and make improvements knowing you have a fallback.

Once your dev environment is stable and reflects the new changes, you can "deploy" by simply making the dev environment the new "production." Or, add the updates to the production base.
If you don't need to perform writes in the development environment, then you should consider "syncing" the data (one way) from your production base to the development base using Airtable's sync functionality. Any updates to the data in the table shared from the production base will then be reflected in the development base. Keep in mind a synced view is read only - so this can work for some use cases but not all.
Schema design
As much as possible, treat Airtable as a traditional, relational database. You want your schema to help you maintain data integrity and understand the relationships between your records.
Airtable actively fights traditional schema design in two ways:
- It is so easy to add fields and views that you can quickly begin to duplicate data across many tables with
lookups - You can begin to mix business logic with raw data using calculated fields (i.e.
formulas,rollups, andcounts).
In the big scheme of things, lookups and calculated fields are helpful. These capabilities make Airtable easy for everyday users to work with their data in Airtable.
However, for the developer, these field types can create a mess. So to make things easier, implement a simple naming convention: add some sort of delineation (like an underscore) in front of any Airtable column that is a lookup or calculated field.
You'll find that this will make working with your data in your prototype easier without sacrificing the underlying power of Airtable. When you are pulling data into your prototype you will be able to quickly see which fields are derived or linked.
This naming convention will also come in handy should your prototype evolve into a production app that is too big for Airtable to handle. A simple _ in front of each field that is calculated will help you see and properly deal with any Airtable dependencies.
Pro tip: use the Airtable base schema app to spin up an ERD for your base to better visualize these risks.
Users, personas, and permissions
It's a timeless question: "who is my user?" Luckily, an Airtable prototype can help you come to an answer.
With Airtable, you can not only manage your prototype's users and permissions - but you can also easily enrich your user data with persona and demographic tags to help you segment and introspect your users.
To manage users and permissions in Airtable, you'll create a users table just as you would in a relational database. Here is how:
- Create a table where you will store user information. The primary column should be a unique identifier for the user - like their email.
- In other fields in the user table, record helpful user data like referral source, persona, job role, and more.
- Use linked records to then associate users to their data in other tables.
- Store hashed passwords and login information in the
userstable as well.
This post from Stacker lays out the structure well.
The beauty of Airtable is that managing users is not only possible, but you can make it as manual or automated as you like. For instance, if security isn't a big deal for your early prototype (i.e. you aren't working with real users or any PII) you can manually create users and store simple passwords. Or, you can go the extra mile and create entire login flows that store hashed passwords in Airtable. It's up to you.
Seed your database
Oftentimes an early prototype can run on mock data to help a team quickly understand the shape of their data model. Airtable makes working with mock data easy.
Of course, you can just type in data with all the edit tools you are familiar with from spreadsheets.
Or, you can also import existing data from CSV and XML documents.
There is also a helpful script in the marketplace for filling a base with dummy values.
Tip: To generate dummy data, check out Mockaroo. Just export the mock data as a CSV and import it into Airtable.
Isolate any business logic
As much as possible, put all the logic and automations that manipulate the raw data in your Airtable base in one place so you can manage it.
For many prototypes, you'll likely house the business logic in the front-end application you are building. So try to keep all derived calculations and validation in the front-end as well.
For other prototypes, you might manage this business logic in Airtable. If you take this approach, instead of using calculated fields that spread logic across each table of your base, use Airtable automations to detect when a row is created or changed - and then use an Airtable script to calculate and insert derived fields. This can make managing the business logic much simpler because you can see it all in one place as plaintext.
In instances where you need to use calculated fields, use the naming convention suggested previously to help you keep things straight.
Additionally, try to stick to one automation service. If you use Zapier, don't split automations between Zapier AND Airtable automations. Try to use just one.
In fact, to help you and your team keep everything in order, document all integrations as a sort of README using Airtable's Description app. In the description block list all the services that are pushing data into your Airtable base (i.e. forms, webhook integrations, or automations) and what fields they touch.
Simplify reads
The Airtable REST API is not great for prototyping. After working with many customers, we've learned that our product, Sequin, works great for prototyping on Airtable because you can access all your Airtable data using SQL. Here is why:
Even with Airtable.js to help manage retries, reading data through the API is an uphill climb. Between the rate limits, pagination, and Airtable's unique filterBy parameter you'll find many little quirks. The API is especially slow and onerous when you need to make nested calls to source data from several tables to create a complete data view. And, as you leverage Airtable's ease of use to make updates to your base, your API calls can break as columns and tables change.
Sequin allows you to skip the API by replicating Airtable to a Postgres database. You can then use SQL to quickly SELECT, JOIN, and GROUP BY to get the data you need. For example, you can become agnostic to column changes when sourcing data into your app by simply activating the Sync all tables setting in Sequin and then use SELECT * in your query. As new columns and tables, appear, they'll load into your app and you can work with them directly.
This reduces the amount of code you need to write, speeds up your data request, and simplifies maintenance as you iteratively improve your prototype.
You can also connect your Sequin Postgres database to all sorts of ORMs like Prisma or generate a GraphQL API using Hasura. The entire Postgres ecosystem is at your disposal to help you build.
Conclusion
Prototypes built on Airtable are uniquely powerful. By giving you a flexible datastore that anyone on your team can use, Airtable can help you quickly build a data model that powers working software. When built with these six, simple conventions, you'll be able to not only build functional software on Airtable - but you'll also be able to quickly iterate, operate, and maintain that prototype as you grow. Get building.
